


 Documentation Home
 Recently Changed
Registration using a Network Named User license and the Embarcadero License Center
Registration of Visual Assist within large teams is possible with a Network Named User (NNU) license, and installation of a local license server, the Embarcadero License Center (ELC). (Whole Tomato Software and Embarcadero are both Idera, Inc. companies).
Registration of Visual Assist with an NNU and ELC requires:
- installing and configuring the ELC
- downloading a license file from the ELC, and distributing the file to the users of Visual Assist
- instructing users to register Visual Assist with the license file.
Only the ELC administrator requires an EDN account, and only the server running ELC—for simplest administration—requires access to the internet.
A quick-start guide, with links to the ELC installers, and complete documentation for ELC are available on the Embarcadero website. The tips herein assist your navigating the Embarcadero resources, primarily because the Embarcadero resources do not address Visual Assist.
Contact licenses@wholetomato.com if you need assistance with an NNU or the ELC.
Tips:
- The ELC administrator requires an EDN account, but that account is created upon purchase of an NNU if such an account does not already exist. (Additional licenses and renewal of maintenance are automatically associated with a customer's existing EDN account.) Credentials for the EDN account are included in the email that contains the details of the NNU license. Look for an email with subject "Embarcadero License Certificate #XXXXXX".
- By default, ELC assumes the server running ELC allows inbound TCP connections on port 5567. Accept the default during installation of ELC, then open the port after installation; or configure ELC to use an alternate port.
- After installation of ELC, a browser window opens to the ELC administration tool. Ignore the warning about the requirement for Javascript—it appears whether or not Javascript is enabled.

- Login to the ELC administration tool using credentials in the quick-start guide, i.e. admin/admin, not the credentials for your EDN account.
- Upon initial login, a setup wizard runs. During step three, 'License hosting', enter the credentials to your EDN account, and optionally, the certificate number included in the email that contains the details of the NNU license.

- Click "Host Licenses". (Do not yet click "Next'.) If you did not enter a certificate number with your EDN account credentials, select the license(s) your ELC server should host, then click "Host Licenses" again. (An NNU license may be hosted by only one master ELC server.)

- During step five, "Users and Groups", you must create a list of named users who are authorized to run Visual Assist. If you do not configure LDAP, e.g. Windows Active Directory, manually add names that are the Windows user names, i.e. %username%, of the authorized users. Entries do not have passwords. Make note of errant entries; the list can be amended after the setup wizard finishes. Click "Add" to save changes. (Changes are not saved automatically!)

- In step six, "Named User Licenses", set offline usage to "30 days" to make Visual Assist communicate with the license server as infrequently as possible.

- "Concurrent Licenses" are available for Visual Assist.
Use this page to assign concurrent licenses and configure the maximum offline usage time (up to 30 days).
The Check-in and Check-out License of non-academic concurrent license options are available when Visual Assist is registered using the license file that ELC generates.
The Check-in License returns the license if its duration has not completed. Only ELC administrators can configure the default timeout per user.
The Check-out License reserves a license from ELC if there are available concurrent seats. Users can specify its duration in hours.
- Complete fields in step eight only to be notified of license expirations, i.e. expirations of software maintenance. (An account representative should reach out before expiration whether or not ELC sends notification.)
- Skip step nine, "Invite end users". The template is incorrect: Visual Assist is not available via catalog, and users need a license file that is available only after the setup wizard completes.

- After the setup wizard is finished, edit the list of named users by clicking "ADMINISTRATION > Named Users". Be sure to click "Save to file" to save changes. (Changes are not saved automatically!)

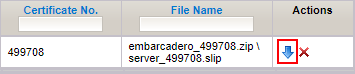
- Obtain the license file to be sent to the users of Visual Assist by clicking "ADMINISTRATION > Licenses". Then, click "License files". Click the blue arrow to the right of your NNU license. Open the downloaded zip, and extract only its named_XXXXXX.slp file. Ignore all other files—they are unnecessary or incorrect.


- Mail the extracted license file to the named users of Visual Assist. Instruct the users to register Visual Assist with a license file.
- After renewing software maintenance for an NNU license, click "Administration > License Hosting" to add a new certificate, click "Administration > Licenses" to obtain a new license file to send to users, and mail the new named_XXXXXX.slp with instructions to register Visual Assist with a license file.
- To change the admin password to the ELC administration tool, login as admin and click "Change password" in the top menu. Change your password, then reboot the ELC server or restart the ELC service. (Your old password is active until reboot or restart.) To restart the service in Windows 10, open:
Start > Control Panel > Administrative Tools > Services
Then, scroll to "ELC", and click "Restart the service".

- To determine recent use of an NNU license, click "ADMINISTRATION > Reports", then click "Application Usage Duration by User Report".
- To debug a user's inability to register Visual Assist using a license file, click "ADMINISTRATION > License Server Logs", set level to "INFO", and set "End date" to a date in the future. (A date in the future ensures the report includes recent activity.) If you are unable to debug, contact licenses@wholetomato.com for assistance.
- To revisit the ELC administration tool when logged into the ELC server, and when using the default port for ELC administration, visit localhost:5580/loginAdmin.jsp.